this is (non)sense
week7
Checking the bioplastic
documentation
For the weekend we made a new bioplastic sheet, so it had the whole weekend to dry. Bioplastic attaches itself to wood but not to plexiglass. We had to cut the bioplastic around the edges. The bioplastic wasn't completely dry yet, so we hung the bioplastic sheet on clothes pegs. When generating static energy, the plate should be as dry as possible. Humidity reduces conductivity. However, we are getting better and better at distributing the thickness of the sheet.
Thermoforming
For the assignment, we wanted to make an accessory with styrofoam balls and make them static. At first we thought of a chain. We decided to vacuum-form a sphere with a diameter of 60 mm and a PET plate with a thickness of 1 mm. The machine indicated how long a plate should be heated for the best result, but the material PET was not indicated on it. At the first attempt we got a big wrinkle in the material when heating it for 28 seconds. For our 2nd attempt we heated the plate for 20 seconds. This made the ripple in the material a lot less.
To loosen the mould, we had to use compressed air. After the domes were cut out, we filled them with polystyrene foam balls. The domes are glued with second glue. After rubbing the sphere, static energy was created here as well.
/Further experiments and work with the Vortex gun by Asle
In slow motion
Not so slow motion
As seen especially in slow motion the vortex is seen as a ring moving quite fast (e.g. look how Andy turns his head way after the smoke ring way too late)
The smoke came from Andy's E-cigarette and inspired by it I wanted to know if it was possible to create the smoke myself. I also wanted to create a more proper vortex gun which led me to some experiments with materials.
To create a vortex you would need a chamber and a somewhat round hole for the air to come out. Whether the actual shape of the champer matters I don't know for sure but I thought that like a riffel it won't hurt with a longer barrel for more precision. I thefore thought that I might be able to creative cylinder shape with a cheap material like MDP or plywood and I therefore made several test to see the limits of it's ability to bend. As seen above with the MDF...it didn't work out that well. I tried with different power and placement of the lines cut but with no doable result.
It didn't work out any better in plywood - even when taken the direction of the grains into account
I slowly came up with the idea of making the chamber/barrel into a hexagon. When bending (without cutting through the material at any point) seemed not possible for this purpose I tried to look at already made boxes to see how tight the joinst would turn out and how much space it will take up since my design wouldn't require a membrane as with the prototype but a slideable part turning crosswise and made in a solid material powered by elastics as was it a slingshot.

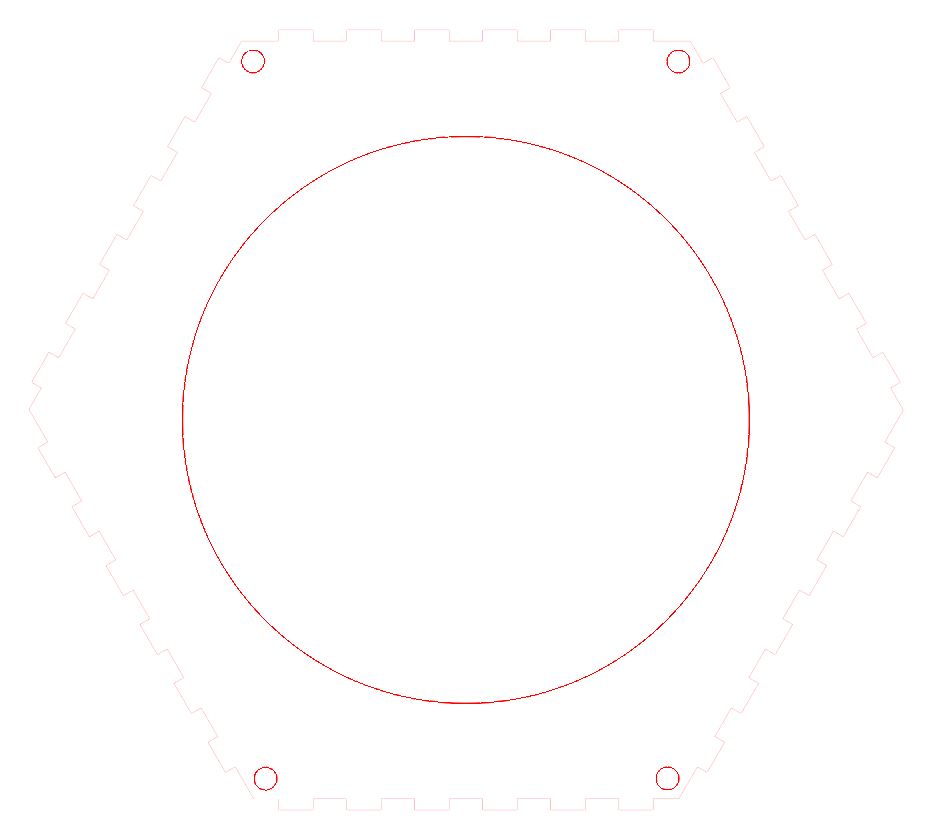
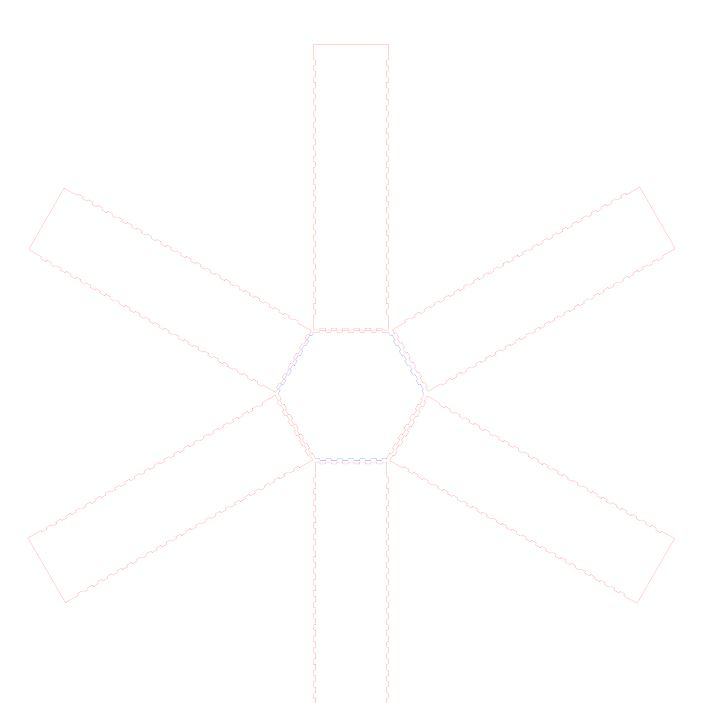
Before working further on the hexagon idea I had to see how much space the joints would make up with a hexagon. The laser can unly cut from a straight 90 degress angle and there would eventually going to be a little irregularities that eventually could impact the tightness of the chamber and the 'slide' inside it that would press the air instead of the membrane. I therefore made a little piece that I could measure 120 degrees with and observed what would happen be looking at Moritz's box for his hologram. At this point is seems more than possible!
Realising the construction could be made not by bending but simply assembling the hexagon I would look into what makes the moving vortex visible: smoke.
A read a little about the topic online and found this guide where a man creates a fog machine from a hairdryer, cotton and glycerol.
Inspired I required the necessary things and started making my own experiences with heat and glycerol - and how to vaporize it the most effective way.
Equipted with a thermometer, a hairdryer, a hearting gun, wooden skewers, cotton, would, steel wire, glycerol and a little water (for extinguishing my failed attempts.. I initially started to figure out something with glycerol and temperatures.
The heat threads in the air dryer had a maximum of 180 degrees at high power and 120 degress at the lower setting. Both were insufficiant in vapourizing the glycerol. What might be the reason for it not working as in the video could both be the less power/heat (the hair dryer is a traveling version with less wattage than a regular hair dryer) but also the strong wind fan that would keep the threads cool to a certain extent. Unfortunatly the design of the hairdryer makes it impossible to remove/take of the fan as it motor is positioned within the heat threads and would therefore possible burn out within minutes because of the lack of cooling.
With the heat gun I fund out that it definitely works at 320 degrees and that the great difference in the level of smoke happens at around 250 degress. It is also way better to heat the glycerol through cotton or wool - though the latter tends to burn way more easy. I tried heating it with a soldering iron and though working it doesn't work as well as if the glycerol is put onto a more 'airy' medium as cotton e.g.
The thing about it burning did also cause a little trouble. Not least to Xander who were really concerned about me tricking the fire alarm. Well, that didn't happen fortunately. But I wouldn't recommend making a box out of cardboard for a thing that connects wool, cotton and heat.. And if you do read the comments on the video (as I of course did afterwards....) you will see that I wasn't the only one who ended up setting things on fire.
For know I have put the thing about the smoke on a hold. I will at least firstly finish the vortex gun before researching this area more as it can be solved by turning into commercial products (like the vapourizer from an E-cigarette).
FINAL VISUALISATION DECISIONS - COLOUR CARD, PRESENTATION ETC.
/ figuring out the colour card
/ presentation ideas
/ what's up with the bioplastic
/ usage of the bioplastic
Since one of the feedbacks given from Marjolijn and Rebecca was that the end result has to express coherent shape and colour result, I decided to dive into it and make clear visualisations. Intention was that with this, would make it easier to take decisions at the end and the part of 'making it coherent' would be done already throughout the process, without taking the steps back and changing the products.
We all agreed on the colour palette which includes neutral tones with few emphasises of the accent colours. So after all the try outs and suggestions that I gathered (visible on ToE) we made a decision to go with the following colour card. Of course it is not always possible to find the perfect matching tones, but our intention is to aim for something like this.
If we would decide to use some photographs, could be interesting to hang them from the wall in a running order. Maybe also some diaprojections on the wall.
Usage of the blocks, to exhibit the objects and place them all over the space in an organised way.
The blocks could be covered with text or relevant pictures/colours as well.
Using some sort of 'hangers' would be helpful with presentation of the texts and visuals, maybe of the process itself.
Beside of using the physical content, would be interesting to have some digital shots to exhibit the process or maybe in my case how the garment reacts in different environments, so fusing the physical content, photographs and videos.
Me and Melissa were waiting for bioplastic to dry so we could proceed with some of the bioplastic experiments. We poured the liquid of the bioplastic onto the plexiglass frame to dry and afterwards since it wasn't completely dry yet, we hanged it up so it could dry easier.
While the bioplastic sheet was drying I though of ways to incorporate it into the garments and I thought would be nice to vacuum something and place it as a patch onto the garment. With that we also combine Melissa's experimentation with the ball forming, so consequently it fits together shape wise.
/ We figured out that we are quite coordinated when it comes to dividing the tasks.
We may all have separate tests but at the end they will all come together.
Neza was already looking for inspiration for the exhibition, and making a color chart. While Asle was busy making the effect of his vortex gun visible.
Melissa was busy making different shapes with the vacuum former, to see what effect this has on the styrofoam balls.
/COLLABORATIVE LEARNINGS